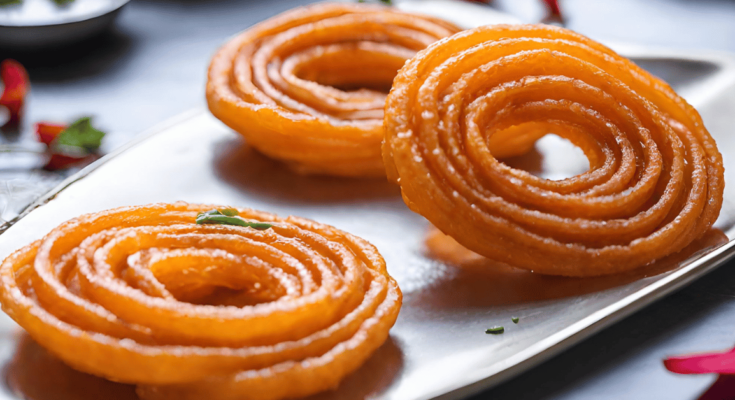
Jalebi, a beloved Indian sweet, is more than just a dessert; it’s a cultural icon. With its crispy, tangled strands soaked in aromatic sugar syrup, jalebi tantalizes taste buds and evokes fond memories of festivities and celebrations. In this comprehensive guide, we’ll explore the intricate process of making perfect jalebis right in your kitchen.
Ingredients Required
To embark on this culinary journey, gather the following ingredients:
- Flour: Typically all-purpose flour (maida) is used.
- Yogurt: Adds a tangy flavor and aids in fermentation.
- Sugar: For both the batter and the syrup.
- Saffron: Imparts a golden hue and delicate aroma.
- Cardamom: Ground cardamom for flavoring.
- Oil/Ghee: For deep frying the jalebis to crispy perfection.
Preparation of Batter
Creating the perfect jilapi batter is an art in itself. Follow these steps:
- Mixing the Ingredients: Combine flour, yogurt, and water to form a smooth batter.
- Consistency of the Batter: It should be thick yet flowing, similar to pancake batter.
- Fermentation Process: Allow the batter to ferment for a few hours to develop flavor and texture.
Preparing the Sugar Syrup
The sugar syrup is what gives jilapis their signature sweetness. Here’s how to make it:
- Ratio of Sugar and Water: Use a 1:1 ratio for a syrup that’s not too thick or too thin.
- Flavorings (Saffron, Cardamom): Add saffron strands and ground cardamom for enhanced aroma and taste.
- Consistency of Syrup: It should be sticky but not crystallized, with a thread-like consistency.
Frying Technique
The frying technique plays a crucial role in achieving the perfect texture. Follow these steps:
- Choosing the Right Utensil: Opt for a wide, flat pan or kadhai for even frying.
- Heating the Oil/Ghee: Heat the oil or ghee to the right temperature, around 180°C (350°F).
- Pipe or Pour?: Decide whether to use a piping bag or simply pour the batter into the oil in a circular motion.
Jalebi Making Process
Now comes the fun part—making the jalebis themselves:
- Piping/Pouring the Batter: Transfer the batter into a piping bag or a squeeze bottle.
- Circular Motion Technique: Squeeze the batter in a circular motion, forming concentric circles.
- Achieving the Desired Shape: Aim for a pretzel-like shape with interconnected loops.
Frying Jalebis
Frying the jalebis requires patience and precision. Here’s how to do it:
- Time and Temperature: Fry the jilapis until they are golden brown, adjusting the heat as needed.
- Crispiness vs. Softness: Some prefer crisp jilapis , while others enjoy them softer. Adjust frying time accordingly.
- Drainage and Dabbing: After frying, drain excess oil by placing the jilapis on paper towels.
Dipping in Sugar Syrup
The final step is immersing the fried jalebis in the sugar syrup:
- Hot or Cold?: Dip the jalebis in hot syrup for better absorption.
- Soaking Time: Let the jalebis soak for a few seconds to absorb the syrup.
- Ensuring Even Coating: Ensure each jalebi is evenly coated with syrup for consistent sweetness.
Presentation and Garnishing
Present your jalebis in an enticing manner:
- Plating Techniques: Arrange the jilapis in a circular pattern on a serving plate.
- Garnish Options: Sprinkle chopped nuts or garnish with saffron strands for an elegant touch.
- Serving Suggestions: Serve jalebis hot with a side of creamy rabri or chilled milk for a classic combination.
Tips for Perfect Jalebis
Achieving perfection with jalebis requires attention to detail:
- Temperature Control: Maintain a consistent temperature while frying for uniform results.
- Consistency in Batter: Ensure the batter is neither too thick nor too thin for the ideal texture.
- Practice Makes Perfect: Don’t be discouraged if your first attempt isn’t flawless; practice improves skill.
Health Considerations
While jalebis are undeniably delicious, moderation is key:
- Caloric Content: Jilapis are high in calories due to deep frying and sugar content.
- Sugar Levels: Diabetics and those watching their sugar intake should consume jalebis in moderation.
- Moderation and Balance: Enjoy jalebis as an occasional treat rather than a daily indulgence.
Vegan and Gluten-Free Alternatives
For those with dietary restrictions, there are alternatives:
- Substitutes for Dairy and Flour: Use plant-based yogurt and gluten-free flour for vegan and gluten-free jilapis .
- Adjusting Recipes for Dietary Needs: Experiment with alternative ingredients to suit your dietary preferences.
READ MORE: https://recipereverie.com/gulab-jamun/
Jalebi Variations
Explore the diverse world of jalebi variations:
- Regional Variants: Different regions in India have their own unique styles of jilapi.
- Fusion Jilapis : Experiment with fillings such as chocolate or fruit for a modern twist on this classic dessert.
Accompaniments
Pair your jalebis with complementary flavors:
- Traditional Pairings: Serve jilapis with creamy rabri or a glass of chilled milk for a traditional experience.
- Modern Twists: Get creative by pairing jilapis with ice cream or custard for a decadent treat.
Jalebi in Popular Culture
Jalebis have left their mark on literature, film, and celebrations:
- References in Literature and Film: Jilapis are often mentioned in Indian literature and depicted in Bollywood movies.
- Festivals and Celebrations: They are a staple at weddings, festivals, and other joyous occasions.
DIY Jalebi Making at Home
Making jalebis at home is not only delicious but also a fun activity for the whole family:
- Family Activities: Involve your loved ones in the jilapi-making process for a memorable bonding experience.
- Cooking with Kids: Teach children about Indian cuisine and traditions through hands-on cooking.
Jalebi as Street Food
Experience the joy of indulging in jilapis from street vendors:
- Iconic jilapi Vendors: Seek out renowned jilapi vendors in bustling markets and streets.
- Street Food Culture: Immerse yourself in the vibrant street food culture of India while savoring hot, crispy jilapis .
Preservation and Storage
While best enjoyed fresh, jilapis can be stored for later consumption:
- Shelf Life: Store jilapis in an airtight container for up to two days.
- Reheating Techniques: Reheat jilapi in the oven or microwave for a crispy texture.
Jalebi as a Symbol of Celebration
Jilapis hold special significance in Indian celebrations:
- Wedding Rituals: They are often served at weddings as a symbol of sweetness and prosperity.
- Religious Festivities: Jilapis are offered as prasad (religious offering) during auspicious ceremonies and festivals.
Conclusion
In conclusion, mastering the art of making jalebis is a rewarding endeavor that allows you to savor the flavors of India’s rich culinary heritage. Whether enjoyed as a festive treat or a comforting indulgence, jalebis never fail to delight the senses. So why wait? Roll up your sleeves, gather your ingredients, and embark on a sweet journey to jilapi perfection!
Frequently Asked Questions (FAQs)
- Can I make jalebis without yogurt?
- While yogurt adds a distinct tanginess to the batter and aids in fermentation, you can substitute it with lemon juice or vinegar mixed with water for similar results.
- What type of flour is best for making jalebis?
- All-purpose flour (maida) is commonly used for making jilapis . However, you can also experiment with whole wheat flour or gluten-free flour for variations.
- How long should I ferment the jilapi batter?
- Ideally, allow the batter to ferment for at least 6-8 hours or overnight. This fermentation process helps develop the flavor and texture of the jilapis .
- Can I reuse the sugar syrup for making more batches of jilapi?
- Yes, you can reuse the sugar syrup for subsequent batches of jilapis . However, make sure to strain it to remove any impurities and adjust the consistency if needed by adding a little water.
- What is the best oil for frying this sweet?
- Ghee (clarified butter) is traditionally used for frying jilapis as it adds a rich flavor. However, you can also use vegetable oil or any neutral-flavored oil with good frying properties.
- How do I know when the oil is ready for frying this sweet?
- You can test the readiness of the oil by dropping a small amount of batter into it. If the batter sizzles and rises to the surface immediately, the oil is ready for frying.
- Can I make this sweet without a piping bag?
- Yes, you can pour the batter using a spoon or a squeeze bottle with a wide opening. However, using a piping bag allows for better control and uniformity in shaping the jilapis .
- How do I prevent my this sweet from becoming soggy?
- Ensure that the jilapis are fried at the right temperature and for the appropriate duration to achieve crispiness. Additionally, avoid overcrowding the frying pan, which can lead to steaming and soggy jalebis.
- Can I freeze this sweet for later consumption?
- While jalebis are best enjoyed fresh, you can freeze them in an airtight container for up to a month. Reheat them in an oven or microwave before serving to regain their crispiness.
- What are some common mistakes to avoid when making this sweet?
- Common mistakes include using batter that is too thick or too thin, frying jalebis at the wrong temperature, and not allowing the jalebis to soak in the sugar syrup adequately. Ensure to follow the recipe and instructions carefully for best results.


